In Delta Force, also known as Hazard Operations or Extraction mode, Operations mode encapsulates the essence of the game's high-stakes action. Whether you refer to it as Operations or "raiding," the objective remains consistent—parachute in, gather valuable gear, and escape before rival players or AI enemies eliminate you. What sets this mode apart is the high-risk element typical of extraction shooters; everything you take into the mission is at stake. Should you perish, you lose it all.
This comprehensive guide delves deeper than mere survival techniques. It will walk you through the entire process of Operations mode, from understanding its mechanics to pacing your run, managing your equipment, and making strategic decisions that accumulate value over time. For those solely interested in survival strategies, we recommend visiting our blog, where we have a dedicated guide on the subject.
Whether you're tackling the mode solo or with a team, a solid grasp of the system is crucial for playing intelligently, not just aggressively.
What Operations Mode Actually Is
Delta Force's Operations mode is a dynamic PvPvE sandbox where each session unfolds uniquely. You, along with up to two teammates, drop into a live environment teeming with AI soldiers, loot locations, and other player teams. The mission? To amass as much loot as possible and safely extract before being taken out.
In contrast to conventional shooter modes, there's no score to chase here. Whatever you successfully extract becomes a permanent addition to your inventory outside the raid. However, should you fall in battle, you forfeit everything on your person, except for items secured in your Safe Box. This balance of risk and reward fuels the intensity of Operations mode, making even a simple extraction of medical supplies a nail-biting experience.
Loadout Planning and Inventory Control
Success in Operations begins before you even set foot on the map—it starts with crafting an optimal loadout tailored to the scenario. Each match demands an entry fee, making your loadout decisions pivotal. Essential gear like a helmet, armor, chest rig, and backpack is mandatory; you can't deploy without them. Beyond the basics, your choices will shape your gameplay strategy.
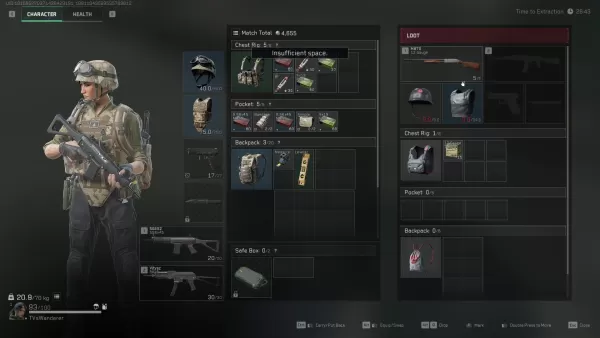
While extraction zones are generally fixed, certain maps feature dynamic elements such as elevators or enemy-controlled checkpoints. It's wise to formulate an exit strategy before diving deep into looting.
Loot Smarter, Not Harder
Every item in Operations has a sell value, but not all are worth the risk. Initially, focus on securing healing items, weapon attachments, and rare electronics—these are compact, valuable, and can be safely stored in your Safe Box if necessary.
While heavy weapons and armor may be tempting, they can hinder your mobility and occupy valuable space. Only consider carrying them if you're confident in your extraction or if you're close to an exit with nothing to lose.
A smart tip for newcomers is to steer clear of major loot areas in the early minutes. Allow other teams to clash and then scavenge what remains. If you're playing solo, focus on looting around the map's periphery and revisit later. You'll be amazed at the quality of items left behind after a fierce team skirmish.
Picking the Right Operative
Your choice of Operative dictates your approach in Operations mode. Not every character is suited for stealth or intensive looting, so select one that aligns with your objectives.
For intel and mobility, Luna and Hackclaw stand out. Luna can mark enemies and disrupt advances with her shock arrows, while Hackclaw moves silently, enabling stealthy takedowns with her knife. Stinger, with his healing abilities, is invaluable for team play, particularly when supporting more aggressive players.
It's best to avoid Operatives with conspicuous or flashy abilities unless your goal is to engage in combat. Characters like D-Wolf are exciting but tend to draw too much attention in a mode where staying under the radar often yields better results.
Fight When It Matters
In Operations, choosing your battles wisely is more crucial than winning them. Engaging in PvP can yield gear and XP, but it also slows you down and attracts unwanted attention. Only fight when necessary or when it's your best course of action.
In a firefight, keep moving and aim to resolve the conflict swiftly. Leverage your abilities to gain an edge—Luna’s detection arrow can reveal players hidden behind cover, while Stinger's smoke can provide a window for healing or retreat.
Remember, you can always loot the fallen later. If two teams are battling, it's often wise to hang back and let them weaken each other. Although risky, third-partying can be an effective way to acquire gear without directly confronting multiple foes.
Making the Most of Each Match
Every raid presents an opportunity to build value, hone your skills, or learn something new. Don't dwell on a bad run—instead, use it to refine your strategy for the next one.
Conserve your credits during losing streaks and play more strategically when you're on a winning streak. Prioritize upgrading your Safe Box early, experiment with different Operative configurations, and familiarize yourself with the maps to discover the most efficient loot routes.
As you progress, your focus will shift from mere survival to optimization. This is when Operations mode truly becomes enjoyable.
Delta Force's Operations mode is far more than a simple loot-and-run scenario. It's a game of risk, meticulous planning, and intelligent decision-making. Approach your loadout with purpose, loot judiciously, and know when to engage or retreat. Every loss is merely a step in the journey that makes your first major victory all the more rewarding.
For the optimal gaming experience, consider playing Delta Force on a PC using BlueStacks. You'll benefit from quicker load times, more precise controls, and easier gear management. It's the best way to stay competitive as you master the intricacies of the game.


